Custom Embeds
A guide to creating custom embeds in various contexts across YAGPDB.
Danger
Embeds have limits, summarized in Discord channel documentation.
Note
Custom Embeds with the -customembed command don’t work in custom commands. If you want to know how you can use embeds
in custom commands, scroll down to Embeds in Custom Commands.
The customembed command
One method of sending an embed with YAGPDB is using the command customembed (or for short, ce).
Create embeds by hand
YAGPDB accepts embeds in JSON following the rules of this format.
There, we’ll take a look at the Embed Objects. You can add a value to each of these objects. A very simple embed would look like this:
{ "title": "This is my title", "description": "This is my description." }The output of this would look like the following:
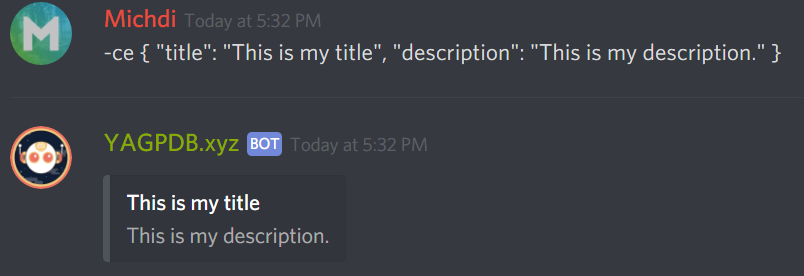
Let’s break this down: We start of with the customembed command -ce. After this, I start my object (the embed) with a
curly brace. Then we have the name of the object (title) and the value of it (This is my title). We separate data with
commas. After that we have the same thing again, but for the description. In the end we close the object (embed) with
another curly brace.
You can add the multiple objects to this, but keep in mind that Discord limits your message to 2000 characters.
The syntax of JSON
The syntax of json is pretty easy. You start off with a curly brace ({) and end with a curly brace (}). Between
this, you can add names and their according values. Data (a name and a value) get separated by commas (,) . Around
strings (text) you wrap two quotation marks (""), but nothing around integers (whole numbers) or booleans (true or
false statements). You can play around with this a bit.
| Special character | Escaped output |
|---|---|
| Quotation mark (") | \" |
| Backslash (\) | \\ |
| Slash (/) | \/ |
| Backspace | \b |
| Form feed | \f |
| New line | \n |
| Carriage return | \r |
| Horizontal tab | \t |
Create embeds with a generator
Creating embeds with a generator can be more difficult if you don’t need any difficult features. If you want your embed to be super shiny, you can use this embed generator. YAGPDB does not use the first part of its code, so you have to remove the following:
{
  "content": "this `supports` __a__ **subset** *of* ~~markdown~~ 😃 ```js\nfunction foo(bar) {\n  console.log(bar);\n}\n\nfoo(1);```",
  "embed":
and the last curly brace (}). After this you can just copy and paste it into Discord:
Embeds in Custom Commands
Danger
Embeds in custom commands are a little more difficult. Also, there is no generator that you could use for this. Please only proceed if you have a good amount of knowledge about custom commands and templates in general.
To start off, we’ll take a look at this example and break it down:
{{ $embed := cembed "title" "This is my title" "description" "This is my description." }}
{{ sendMessage nil $embed }}
First off, I start creating my embed by defining it in a variable called embed in the well-known templating curly
braces. This makes it a bit clearer as your embed can get difficult to read. After this I start my embed object with
cembed (custom embed) to indicate what the following strings mean. We don’t follow the json syntax here and only
define everything one after the other ("name" “value” et cetera). Now we use the objects for discord embeds from the
developer page again. So far, so good. In the
end we send our embed with the sendMessage template. nil sends it in the same channel, but you could also replace it
with a channel name or ID (or send the embed with sendDM as a direct message).
Next, we’ll take a look at this more lavish example:
Note
To make your code readable, especially for large embeds, indents may be used, as YAGPDB’s templating system allows this sort of formatting.
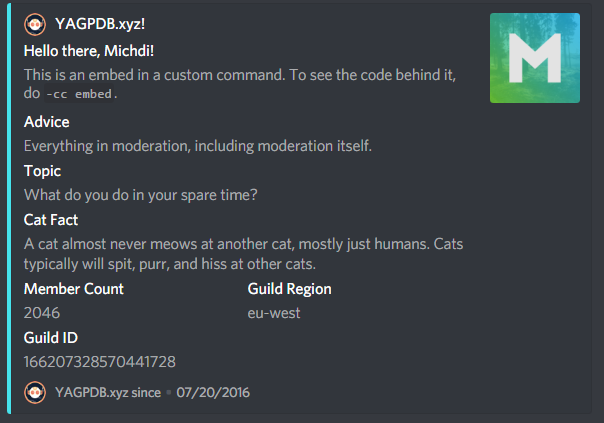
Custom Command “embed”
{{ $advice := execAdmin "advice" }}
{{ $topic := execAdmin "topic" }}
{{ $catfact := execAdmin "catfact" }}
{{ $avatar := print "https://cdn.discordapp.com/avatars/" .User.ID "/" .User.Avatar ".png" }}
{{ $botAvatar := .BotUser.AvatarURL "512" }}
{{ $embed := cembed
"title" (print "Hello there, " .User.Username "!")
"url" (.User.AvatarURL "512")
"description" "This is an embed in a custom command. To see the code behind it, do `-cc embed`."
"color" 4645612
"fields" (cslice
(sdict "name" "Advice" "value" $advice "inline" false)
(sdict "name" "Topic" "value" $topic "inline" false)
(sdict "name" "Cat Fact" "value" $catfact "inline" false)
(sdict "name" "Member Count" "value" (toString .Guild.MemberCount) "inline" true)
(sdict "name" "Guild ID" "value" (toString .Guild.ID) "inline" true)
)
"author"
(sdict
"name" "YAGPDB.xyz!"
"url" "https://yagpdb.xyz/manage"
"icon_url" (.BotUser.AvatarURL "512") )
"thumbnail" (sdict "url" $avatar)
"image" (sdict "url" $botAvatar)
"footer"
(sdict
"text" "YAGPDB.xyz since"
"icon_url" $botAvatar)
"timestamp" .Member.JoinedAt
}}
{{/* this line is here to show raw cembed output */}} {{ $embed }}
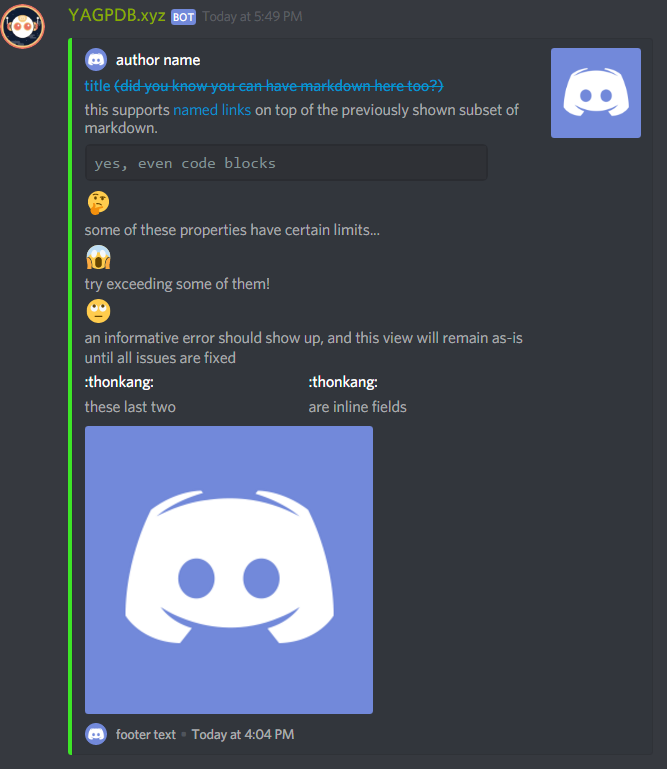
{{ sendMessage nil $embed }}In this example, we can ignore lines 1 to 5. I’m just defining some variables there which I am later using in my embed.
One thing to notice is the two ways of getting user’s avatar URL for variables $avatar and $botAvatar. Line 7 starts
with our already known definition of the embed. Then I start with the first object, the title. Notice how I use print
to join two strings (text snippets) together.
Next, we have the description. We can use markdown of Discord in here. After that object, I define the color. The color
is given as integer and you can convert a hex color to it using
BinaryHex Converter, for example..
Up next, I have added some fields. This is a bit more difficult, but doable if you have understood it once. Let’s break it down in this example:
"fields" (cslice
    (sdict "name" "Title of field 1" "value" "Description of field 1" "inline" false)
    (sdict "name" "Title of field 2" "value" "Description of field 2" "inline" false)
)
This would add two fields being displayed under each other. If you set inline to true, they would try to get displayed next to each other. You can add multiple fields with sdict.
Following the fields I have added the author. Again the author object is nested and can have up to four fields. For
this, we use sdict again. I define the name, the url and the icon url for it. The same applies to the avatar and footer.
In the end I use .Guild.JoinedAt as timestamp to display when the first person joined this server and close the
template. After this we just have to send the embed using SendMessage or SendDM. Here is our result:
Display an image
You can display an image by simply pasting the link to it in the response, or by doing it fancy this way:
(make sure to replace the link with your own image ;))
Trigger type: command trigger: imageembed
{{ $embed := cembed "image" (sdict "url" "https://i.imgur.com/ttIwOmn.png")  }}
{{ sendMessage nil $embed }}
Using colors
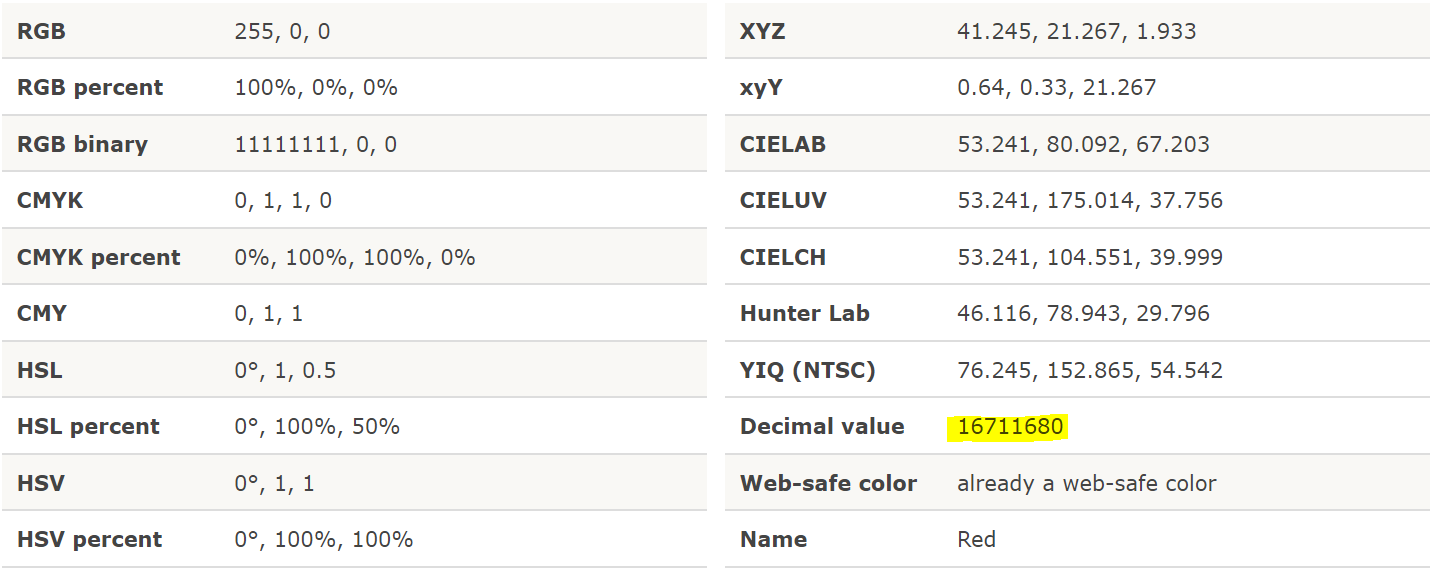
Discord uses color decimal. SpyColor is a good tool to pick colors, or convert hex to decimal.
The simpleembed command
Simple embeds are easier to use than custom embeds as they do not require any knowledge of json. Their downside is that
they don’t support all Discord embed fields from the embed structure, for example fields. You can create a simple embed
with the simpleembed command, se for short.
Simple embeds work with switches, here is a list of them all:
| Switch | Description |
|---|---|
| -channel | Optional channel to send in. |
| -message | Optional message ID to edit. |
| -content | Text content for the message. |
| -title | Title field. |
| -desc | Description field. |
| -color | Color field, either in hex or a color name. |
| -url | URL field for embed. |
| -thumbnail | URL to an image for thumbnail field. |
| -image | URL to an image. |
| -author | Author field. |
| -authoricon | URL for the icon in ‘author’ field. |
| -authorurl | Url of the ‘author’ field |
| -footer | Footer field. |
| -footericon | URL to an image for footer icon field. |
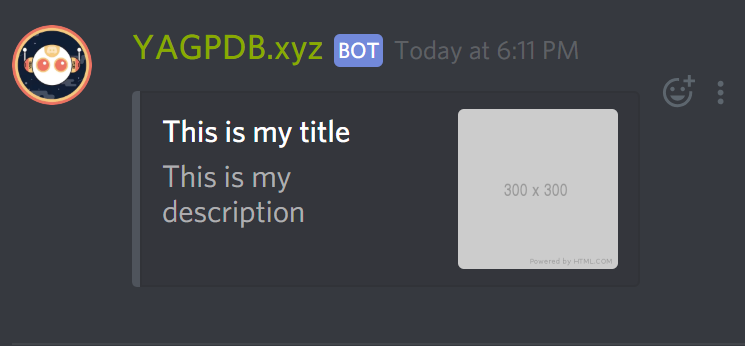
The values for simple embeds need to bet placed within quotes:
-se -title "This is my title" -desc "This is my description" -thumbnail "https://via.placeholder.com/300/"This generates the following embed:
You can play around with this command a bit, it’s really easy to use.
Note
Simple embeds can be used in custom commands:
{{execAdmin "se" "-desc" "This is my description"}}