Custom Interactions
Buttons, Modals, Select Menus, Ephemeral Messages, and more!
Danger
Use of interactions within YAGPDB is an advanced topic; you will need a thorough understanding of YAGPDB’s scripting language before learning interactions.
We have a comprehensive learning course for you to get started.
The Basics
Interactions within Discord allow server members to use alternative, built-in features to trigger bots to take action other than messages or reactions. These features include builtin buttons, dropdown selection menus, or submitting a modal (basically a pop-up form). Within custom commands it is possible to not only create and customize these new interactive features, but respond to them as well, opening up new possibilities for ephemeral message responses, modals, and more within YAGPDB custom templating script.
Interaction Lifetime
An interaction’s lifetime starts with the initial interaction with an interactive element.
- A server member clicks on a button, uses a menu, or submits a modal after filling it out.
- This interaction is sent to YAGPDB, and becomes available to trigger any custom commands which match it.
- Within the triggered custom command(s), YAGPDB should then respond once to the interaction, sending a message, updating the triggering message, or sending a modal. This may only be done within the CC which was triggered by the interaction.
- (optional) Continue to send followup responses for up to 15 minutes until the interaction token expires.
graph LR;
A[Button pressed] --> B{CC Triggered}
C[Menu used] --> B
D[Modal submitted] --> B
B --> E[Bot sends message response]
B --> G[Bot sends modal response]
B --> H[Bot updates message]
E -.-> F(Bot sends followups)
G -.-> F
H -.-> F
Definitions
- Interaction
- A user engaging with YAGPDB through one of Discord’s builtin features: Clicking a button, Making a selection with a select menu, or Submitting a modal.
- Response
- YAGPDB is required to respond promptly after receiving an interaction by either sending a message or modal, or by updating the message on which the interaction was triggered. If it does not do this, the user triggering the interaction will see a “This application did not respond” error. The bot cannot respond to an interaction more than once.
- Followup
- Since YAGPDB may only respond to an interaction once, it is subsequently required to send an interaction followup if it still needs to interface with the interaction. These followups can be sent up to 15 minutes after the initial interaction, and you can send as many as you want. YAGPDB may only send a followup in one of the following ways: Sending a followup message, editing an initial response or previous followup message, or getting an initial response or previous followup message.
- Interactive Elements
- Elements users can interact with to send interactions, i.e. buttons, menus, and modals.
- Message Components
- Interactive Elements which can be attached to YAGPDB’s Discord messages, i.e. buttons and menus.
- Button
- A button appearing in or under a Discord message sent by YAGPDB. You can create and customize these buttons’ appearance and behavior with color, emoji, label text, etc. When a button is clicked, an interaction is sent to the bot.
- Menu
- A dropdown select menu appearing in or under a Discord message sent by YAGPDB. You can create and customize these menus’ appearance and behavior with placeholder text, predefined options with labels, descriptions, and/or emojis, designate the entire menu as a user or role select menu instead, etc. When a select menu is used, an interaction is sent to the bot.
- Modal
- A pop-up form YAGPDB can send in response to an interaction. It allows users to privately input text which is sent directly to YAGPDB for use in CC scripting. You can create and customize these modals’ appearance and behavior with a title and fields. YAGPDB can both receive a submitted modal (which is an interaction), and send a modal for a member to fill out, (which is an interaction response).
- Ephemeral
- An ephemeral message is sent to a server channel but only appears to a single user. YAGPDB cannot send these ephemeral messages to users except in response to an interaction. Both response messages and followup messages can be ephemeral.
Creating Interactive Elements
Before you can start triggering Custom Commands with interactive elements, you’ll need to have elements to interact
with. Message Components can be created and sent with complexMessage and sendMessage. Modals need a triggering
interaction to be sent, meaning you’ll only be able to show a modal after a user has used a message component.
Creating Message Components
Basics
Let’s examine how to make a basic button.
{{ $button := cbutton "label" "Button" }}
{{ $message := complexMessage "buttons" $button }}
{{ sendMessage nil $message }}
Result:

We’ve successfully made a basic button. Currently this button doesn’t do anything when we click it. That’s because it doesn’t have an ID that YAGPDB can use to trigger any other custom commands. For our next iteration, we’ll add a custom ID which can trigger a custom command.
Custom IDs
Note
Multiple buttons and menus can not have the same custom ID in one message.
{{ $button := cbutton "label" "Button" "custom_id" "buttons-duck" }}
{{ $message := complexMessage "buttons" $button }}
{{ sendMessage nil $message }}
This button will now trigger the following custom command:
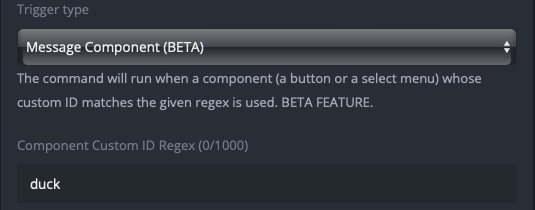
This custom command will trigger on any message component, either button or menu, whose custom ID contains the word “duck.”
Menus
Select menus are available in the following types:
- Text - The options available to be selected are defined when creating the select menu. Options have labels, and can optionally have emojis and longer-form descriptions.
- User - The options are populated with users on the server by Discord.
- Role - The options are populated with roles on the server by Discord.
- Mentionable - The options are auto-populated with both users and roles on the server by Discord, allowing members to select both.
- Channel - The options are populated with channels on the server by Discord. You can limit which channel types appear as options when creating the select menu.
Text Type
Here is an example of a select menu with three text options defined.
{{ $menu := cmenu
  "type" "text"
  "placeholder" "Choose a terrible thing"
  "custom_id" "menus-duck"
  "options" (cslice
    (sdict "label" "Two Ducks" "value" "opt-1" "default" true)
    (sdict "label" "A Duck" "value" "duck-option" "emoji" (sdict "name" "🦆"))
    (sdict "label" "Half a Duck" "value" "third-option" "description" "Don't let the smaller amount fool you."))
  "max_values" 3 }}

{{ sendMessage nil (complexMessage "menus" $menu) }}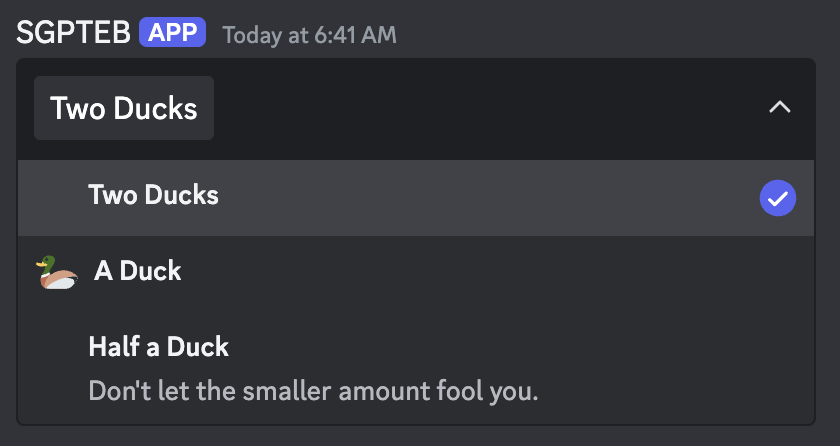
In this menu, our first option (Ducks) is defined as default, which is why it is already selected when we look at the
menu on our server. You can define multiple default options, however the amount of default options you define must fall
between your min_values and max_values.
We have also set the max_values to 3, and we haven’t set a min_values argument. This means the
server member could select anywhere between 1 and 3 of these options.
If the member selected all three options and submitted it (which would send an interaction to YAGPDB), while parsing
that interaction the .Values context data would be ["opt-1" "duck-option" "opt-3"]. This is
because in our code defining the select menu, we defined the "value" args of our menu options as opt-1,
duck-option, and third-option. If the member only selected the “Half a Duck” option, .Values would be
["third-option"].
Other Types
The other menu types are more straightforward. options should not be defined for any menu type except text.
{{ $menu := cmenu
  "type" "role"
  "placeholder" "Choose roles who are secretly ducks"
  "custom_id" "menus-duck-roles"
  "max_values" 3 }}

{{ sendMessage nil (complexMessage "menus" $menu) }}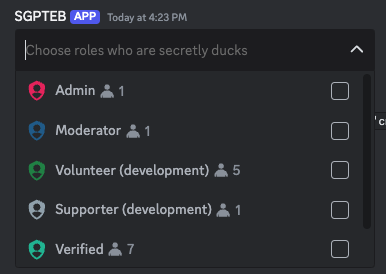
If a member selected roles from this menu, .Values would return a slice of strings containing the IDs of selected
options. This behavior is consistent between user type, role type, mentionable type, and channel type. Note that even in
mentionable type select menus where an ID could be either a user or a role, .Values is still only a slice of IDs. If
you are parsing options from mentionable type menus, you will need to use your own methods of determining if an ID is a
role or a user.
Default Values
Setting default values in these select menus is a more involved process than for text type menus. Instead of setting a
default value on each option, you must instead provide a default_values argument containing a slice of
default value structures.
{{ $adminRoleID := "1210128415689285642" }}
{{ $soggysaussagesUserID := "329826270898683904" }}

{{ $menu := cmenu
  "type" "mentionable"
  "placeholder" "Choose users or roles who are secretly ducks"
  "custom_id" "menus-duck-mentionables"
  "default_values" ( cslice
  ( sdict "type" "role" "id" $adminRoleID )
  ( sdict "type" "user" "id" $soggysaussagesUserID ))
  "max_values" 3 }}

{{ sendMessage nil (complexMessage "menus" $menu) }}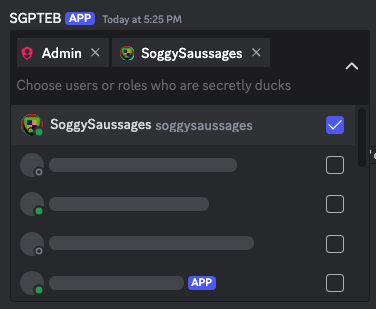
Note
The default_values ids must be strings, not int64s. Note how in the above example, $adminRoleID := "1210128415689285642" defining it as a string, as opposed to $adminRoleID := 1210128415689285642 which would define
it as an int64, which would not work.
Channel Type Filtering
A channel type menu optionally allows you to filter which channel types are made available for selection. You can use
the channel_types argument which accepts a slice of channel types.
{{ $issuesChannel := "1210135699135926312" }}
{{ $updatesChannel := "1210135938722693151" }}

{{ $menu := cmenu
  "type" "channel"
  "placeholder" "Choose channels which are secretly duck hideouts"
  "custom_id" "menus-duck-channels"
  "default_values" ( cslice
  ( sdict "type" "channel" "id" $issuesChannel )
  ( sdict "type" "channel" "id" $updatesChannel ))
  "max_values" 3
  "channel_types" (cslice 5 15) }}

{{ sendMessage nil (complexMessage "menus" $menu) }}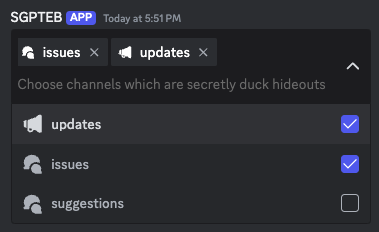
This gives us a select menu which we can only select guild announcement and guild forum channels from.
Multiple Components
Now, let’s add some more buttons.
Note
Buttons with the “link” style cannot have a Custom ID, and instead require a URL field.
Link style buttons do not trigger interactions.
{{ $button1 := cbutton "label" "Duck One" "custom_id" "buttons-duck-alpha" "style" "success" }}
{{ $button2 := cbutton "emoji" (sdict "name" "🦆") "custom_id" "buttons-duck-beta" "style" "danger" }}
{{ $button3 := cbutton "label" "Duck Three" "emoji" (sdict "name" "🦆") "url" "https://yagpdb.xyz" "style" "link" }}
{{ $message := complexMessage "buttons" (cslice $button1 $button2 $button3) }}
{{ sendMessage nil $message }}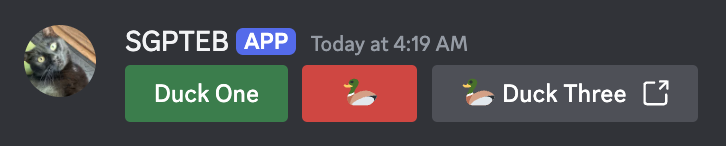
At this stage we have three buttons. Both of the first two buttons will trigger our duck trigger custom command, but the third button will not trigger any custom command. Link buttons do not create interactions.
We can differentiate between the two buttons using .StrippedID, which, just like .StrippedMsg, returns our Custom ID
without the trigger and everything else before that. In our example, .StrippedID will return -alpha for the first
button and -beta for the second button.
Confirming this behavior will be left as an exercise to the reader (you).
Let’s add in a select menu now.
{{ $button1 := cbutton "label" "Duck One" "custom_id" "buttons-duck-alpha" "style" "success" }}
{{ $button2 := cbutton "emoji" (sdict "name" "🦆") "custom_id" "buttons-duck-beta" "style" "danger" }}
{{ $button3 := cbutton "label" "Duck Three" "emoji" (sdict "name" "🦆") "url" "https://yagpdb.xyz" "style" "link" }}

{{ $menu := cmenu
  "type" "text"
  "placeholder" "Choose a terrible thing"
  "custom_id" "menus-duck-alpha"
  "options" (cslice
    (sdict "label" "Ducks" "value" "opt-1" "default" true)
    (sdict "label" "Duck" "value" "opt-2" "emoji" (sdict "name" "🦆"))
    (sdict "label" "Half a Duck" "value" "opt-3" "description" "Don't let the smaller amount fool you."))
  "max_values" 3 }}

{{ $message := complexMessage "buttons" (cslice $button1 $button2 $button3) "menus" $menu }}
{{ sendMessage nil $message }}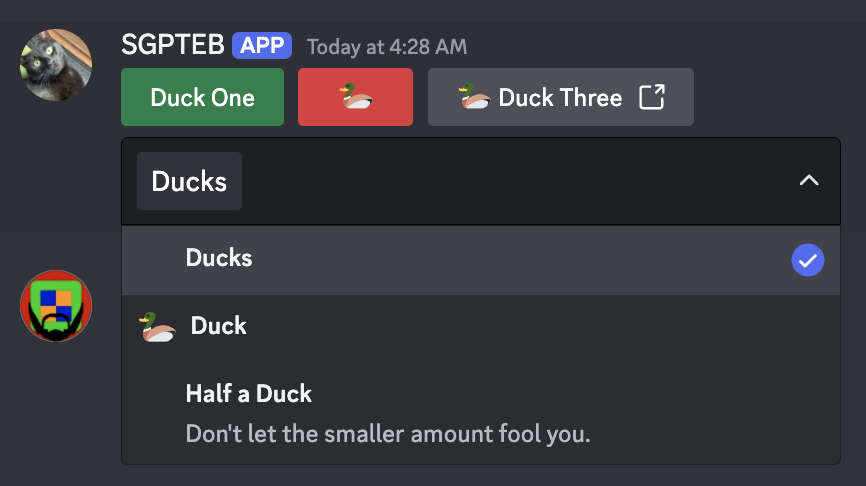
We now have two buttons and a menu which are triggering our duck custom command. We used to branch with .StrippedID,
but now since we have two components whose stripped IDs are -alpha, we’ll need to branch with .IsMenu too. If our
custom command was triggered by the use of this select menu, we could also see that .MenuType returns "string",
since this menu is a string select type menu.
Ordering Message Components
A message can have 5 rows of components. A row of components can have 5 buttons, or 1 menu.
Let’s say we want to play tic tac toe. If we just add 9 buttons into the same slice in our complex message, they’ll just fill the first row with 5 buttons and the second row with 4, which isn’t what we’re looking for. Here’s a solution:
{{ $blankEmoji := sdict "name" "⬜" }}

{{ $row1 := cslice (cbutton "emoji" $blankEmoji "custom_id" "tictactoe-button-1" "style" "secondary") (cbutton "emoji" $blankEmoji "custom_id" "tictactoe-button-2" "style" "secondary") (cbutton "emoji" $blankEmoji "custom_id" "tictactoe-button-3" "style" "secondary") }}
{{ $row2 := cslice (cbutton "emoji" $blankEmoji "custom_id" "tictactoe-button-4" "style" "secondary") (cbutton "emoji" $blankEmoji "custom_id" "tictactoe-button-5" "style" "secondary") (cbutton "emoji" $blankEmoji "custom_id" "tictactoe-button-6" "style" "secondary") }}
{{ $row3 := cslice (cbutton "emoji" $blankEmoji "custom_id" "tictactoe-button-7" "style" "secondary") (cbutton "emoji" $blankEmoji "custom_id" "tictactoe-button-8" "style" "secondary") (cbutton "emoji" $blankEmoji "custom_id" "tictactoe-button-9" "style" "secondary") }}

{{ $menu := cmenu
  "type" "text"
  "placeholder" "Control Panel"
  "custom_id" "tictactoe-menu"
  "options" (cslice
    (sdict "label" "Forfeit" "value" "forfeit")
    (sdict "label" "Toggle Notifications" "value" "notifs"))}}

{{ $message := complexMessage "buttons" $row1 "buttons" $row2 "buttons" $row3 "menus" (cmenu "type" "mentionable") }}
{{ sendMessage nil $message }}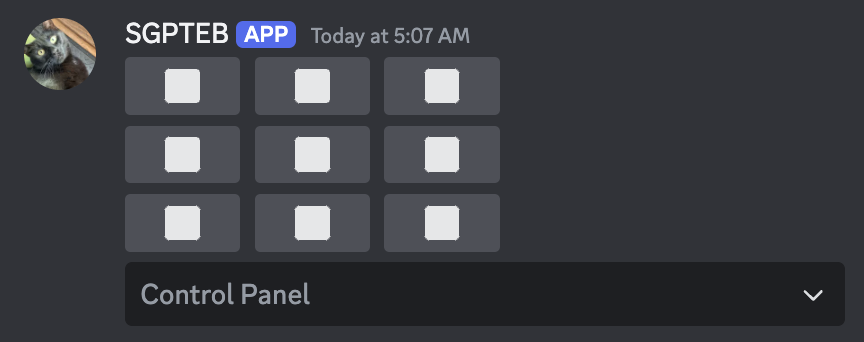
Advanced (Variable Row Counts)
When working with multiple components in advanced flows where final number and order of buttons and menus is variable,
the basic structure of building components with complexMessage will be inefficient for your needs.
Take the following scenario: You are building a turn-based combat game with a variable number of enemies. For each enemy you need a button to attack them, and a button to befriend them. You also want each enemy’s buttons on a separate row.
If you always had three enemies, this code would look something like this:
{{ $message := complexMessage
  "content" "Dragon, Ogre, Duck, attack you!"
  "buttons" (cslice
    (cbutton "label" "Attack Dragon" "style" "red" "custom_id" "attack-dragon")
    (cbutton "label" "Befriend Dragon" "style" "green" "custom_id" "befriend-dragon"))
  "buttons" (cslice
    (cbutton "label" "Attack Ogre" "style" "red" "custom_id" "attack-ogre")
    (cbutton "label" "Befriend Ogre" "style" "green" "custom_id" "befriend-ogre"))
  "buttons" (cslice
    (cbutton "label" "Attack Duck" "style" "red" "custom_id" "attack-duck")
    (cbutton "label" "Befriend Duck" "style" "green" "custom_id" "befriend-duck")) }}
{{ sendMessage nil $message }}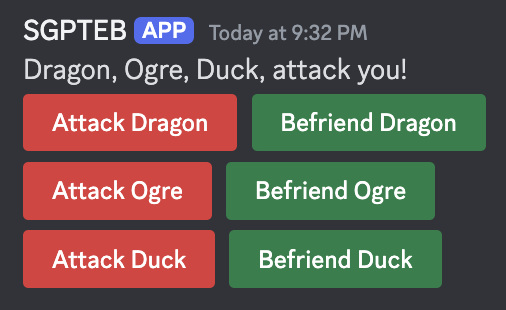
However, we need the number of rows present on the message to be variable. With this method, it is impossible to do this
without building a completely different complexMessage for each number of enemies.
Quick Solution
A quick solution to this problem is to pass all of our buttons into one "buttons" value. Overflowing "buttons",
"menus", or even "components" with more components than the row can take (i.e 6+ buttons or 2+ menus) results in the
function automatically distributing the components to new rows.
{{ $msg1 := complexMessage
  "content" "Message 1"
  "buttons" (cslice (cbutton "label" "Button") (cbutton "label" "Button") (cbutton "label" "Button") (cbutton "label" "Button") (cbutton "label" "Button") (cbutton "label" "Button") (cbutton "label" "Button"))
  "menus" (cslice (cmenu "type" "mentionable") (cmenu "type" "mentionable") (cmenu "type" "mentionable")) }}

{{ $msg2 := complexMessage
  "content" "Message 2"
  "components" (cslice (cbutton "label" "Button") (cmenu "type" "mentionable") (cmenu "type" "mentionable") (cbutton "label" "Button") (cbutton "label" "Button")) }}

{{ sendMessage nil $msg1 }}
{{ sendMessage nil $msg2 }}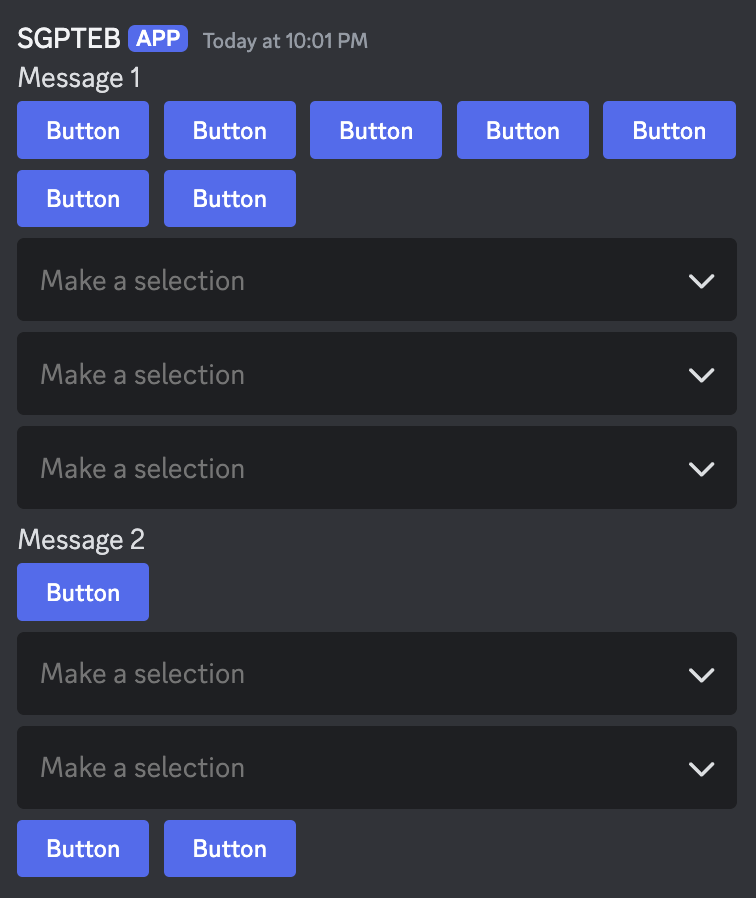
This solution fills up each row with as many components as it can hold and then starts a new one. This is all we need for most commands, but for our turn-based combat scenario, we only want two or three buttons in each row.
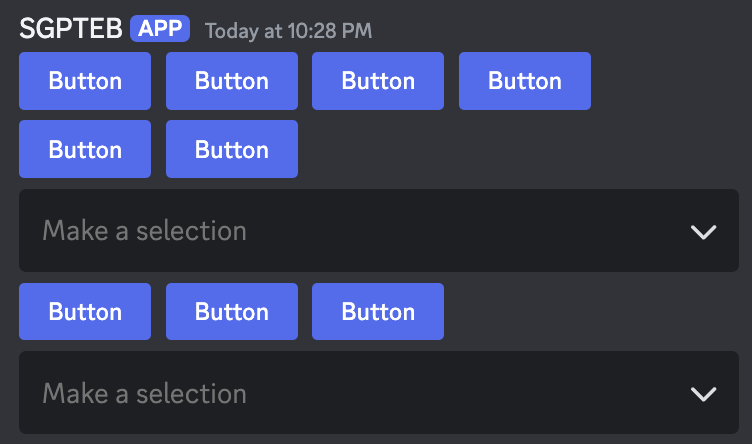
Full Solution
To account for a variable amount of rows while maintaining full customization, we will introduce a new field:
"components". Where "buttons" and "menus" must be a slice of buttons or menus respectively, "components"
must be a slice of rows of buttons/menus.
A row must also be a slice. It either contains 1-5 buttons, or a single select menu.
Below is an example of a components structure.
graph TB
subgraph Components
subgraph Row 1
b1((Button))
b2((Button))
b3((Button))
b4((Button))
end
subgraph Row 2
b5((Button))
b6((Button))
end
subgraph Row 3
m1[Select Menu]
end
subgraph Row 4
b7((Button))
b8((Button))
b9((Button))
end
subgraph Row 5
m2[Select Menu]
end
end
In scripting, this manifests from the following code:
{{ $row1 := cslice (cbutton "label" "Button") (cbutton "label" "Button") (cbutton "label" "Button") (cbutton "label" "Button") }}
{{ $row2 := cslice (cbutton "label" "Button") (cbutton "label" "Button") }}
{{ $row3 := cslice (cmenu "type" "mentionable") }}
{{ $row4 := cslice (cbutton "label" "Button") (cbutton "label" "Button") (cbutton "label" "Button") }}
{{ $row5 := cslice (cmenu "type" "mentionable") }}

{{ $rows := cslice $row1 $row2 $row3 $row4 $row5 }}

{{ $message := complexMessage "components" $rows }}
{{ sendMessage nil $message }}
Which produces this message:
When applying this new skill to our turn-based combat game, the code looks something like this:
{{ $rows := cslice }}
{{ $enemies := cslice "Dragon" "Ogre" "Duck" }}

{{ range $enemyName := $enemies }}
  {{ $nameButton := cbutton "label" $enemyName "style" "grey" "disabled" true }}
  {{ $attackButton := cbutton "label" "Attack" "style" "red" "custom_id" (print "attack-" (lower $enemyName)) }}
  {{ $befriendButton := cbutton "label" "Befriend" "style" "green" "custom_id" (print "befriend-" (lower $enemyName)) }}

  {{ $currentRow := cslice $nameButton $attackButton $befriendButton }}
  {{ $rows = $rows.Append $currentRow }}
{{ end }}

{{ $promptText := joinStr ", " "Suddenly" $enemies "attack you!" }}
{{ $message := complexMessage "content" $promptText "components" $rows }}
{{ sendMessage nil $message }}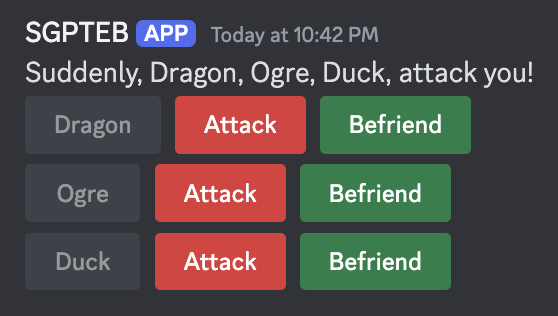
Emojis in Message Components
Buttons and Select Menu Options both have an "emoji" field, but this field does not accept the regular unicode/name:id
formula like reactions do. Emojis in components follow the partial emoji
object structure, however only the ID or the Name
fields are required, depending on if you are using a custom emoji or not.
| Field | Description |
|---|---|
| ID | ID of the emoji, only necessary when using Custom Emoji. |
| Name | Name of the emoji, use the unicode character here. Only necessary when using builtin unicode emojis. |
{{ $unicodeEmojiButton := cbutton "emoji" (sdict "name" "😀") }}
{{ $customEmojiButton := cbutton "emoji" (sdict "id" "733037741532643428") }}
{{ $animatedEmojiButton := cbutton "emoji" (sdict "id" "786307104247775302") }}

{{ $components := cslice $unicodeEmojiButton $customEmojiButton $animatedEmojiButton }}
{{ sendMessage nil (complexMessage "components" $components)}}
Message Component Limits
General
| Field | Limits |
|---|---|
| Custom ID | string, max 100 characters |
| Components | Max 5 rows of components in each message |
Buttons Limits
| Field | Limits |
|---|---|
| Components | Max 5 buttons in each row |
| Label | string, max 100 characters |
Menus Limits
| Field | Limits |
|---|---|
| Components | Max 1 menu in each row |
| Options | Max 25 options in each menu |
| Placeholder | string, max 150 characters |
| DefaultValues | Count of default values must fall within your defined min_values and max_values range. Default values are only used for select menu types other than Text. Configuring default values in text select menus is done whilst creating the options themselves. Use the default arg to mark the option as a default value. |
| MinValues | integer between 0-25 |
| MaxValues | integer between 1-25 |
Text-Type Option Limits
| Field | Limits |
|---|---|
| Label | String, max 100 characters. |
| Value | String, max 100 characters. |
| Description | String, max 100 characters. |
Creating Modals
Modals can be created as either an sdict or a cmodal. After being created they are subsequently sent with
sendModal. Sending a modal is a response to an interaction, meaning it can only be sent once after a user clicks a
button or uses a select menu. You cannot send a modal as a response to a user submitting a modal.
Modal structure
| Field | Description |
|---|---|
| Title | The modal’s title, appears at the top of the modal while a user is filling it out. |
| Custom ID | The Custom ID is referenced to trigger a custom command when the modal is submitted (which you’ll need to do if you care about retrieving what the user inputted). |
| Fields | A slice of discordgo.TextInputComponents. |
{{ $modal := sdict
  "title" "My Custom Modal"
  "custom_id" "modals-my_first_modal"
  "fields" (cslice
    (sdict "label" "Name" "placeholder" "Duck" "required" true)
    (sdict "label" "Do you like ducks?" "value" "Heck no")
    (sdict "label" "Duck hate essay" "min_length" 100 "style" 2)) }}
{{ sendModal $modal }}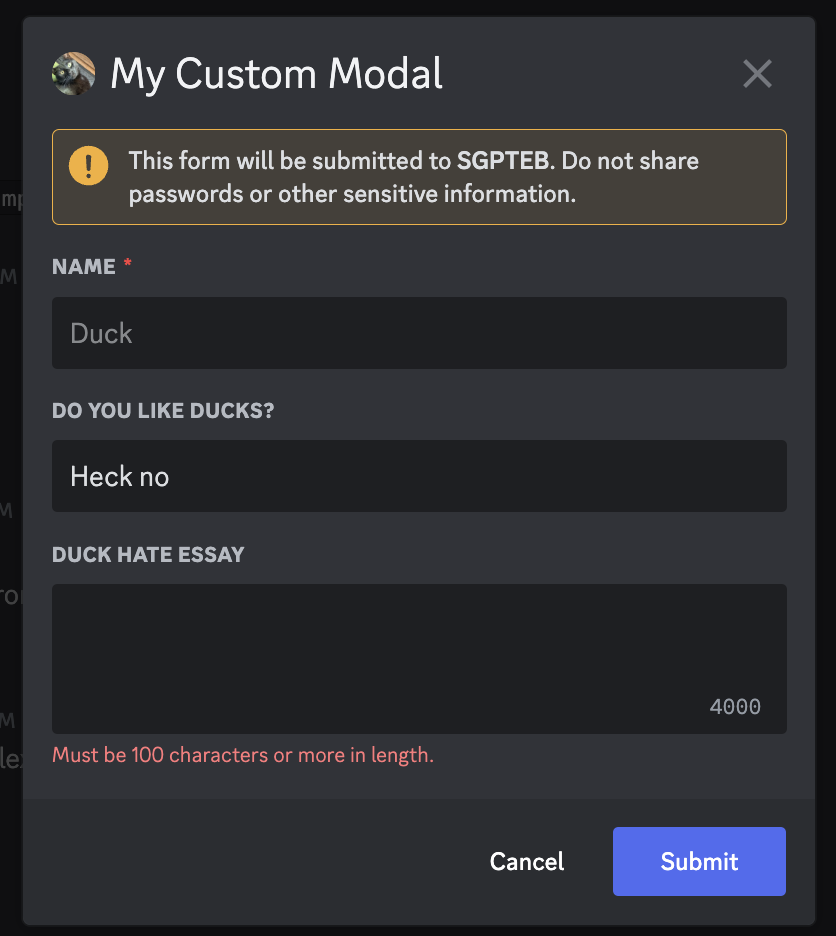
Parsing an Interaction
Custom Commands with the Message Component or Modal Submission trigger allow you to take action upon the press of a button, use of a select menu, or completion of a modal form. Interaction triggers provide new context data for templating.
Important interaction context data
| Field | Description |
|---|---|
| .Interaction.Token | The interaction’s token. Is unique to each interaction. Required for sending followup interactions. |
| .CustomID | The triggering component/modal’s Custom ID. Note: This custom ID excludes the templates- prefix which is added to all components and modals under the hood. |
| .StrippedID | “Strips” or cuts off the triggering part of the custom ID and prints out everything else after that. Bear in mind, when using regex as trigger, for example "day" and input custom ID is "have-a-nice-day-my-dear-YAG" output will be "-my-dear-YAG" — rest is cut off. |
| .Values | List of all options selected with a select menu, OR all values input into a modal in order. |
Interaction object and context data
.Interaction.Token must be provided to any followup functions you decide to use later. If you are
using these in subsequent script executions, it’s a good idea to save this to database when the interaction occurs.
.CustomID can be used to identify which component or modal triggered the command. .StrippedID can be used to quickly
parse out arguments in your custom ID, and use them in your response.
Example: An UNO custom command system where all uno buttons are parsed in the same custom command, a component trigger
with the trigger field uno-. This can take individual action for a button with custom ID uno-join and one with
uno-leave.
{{ if eq .StrippedID "join" }}
	{{ sendResponse nil "You joined the UNO game!" }}
{{ else if eq .StrippedID "leave" }}
	{{ sendResponse nil "You left the UNO game :(" }}
{{ end }}
.Values is used to capture values a user selected in a select menu or submitted to a modal. When creating a select
menu and defining the options, the "value" field for each option defines which values will show up in this slice if
chosen. A modal’s values are simply the values of each field in order.
Example: A user has chosen an option in a select menu whose value is blue-7, triggering the following command which will
determine if it is a playable card.
{{ $selectedOptions := .Values }} {{/* ["blue-7"] */}}
{{ $cardRaw := index $selectedOptions 0 }} {{/* "blue-7" */}}
{{ $cardSplit := split $cardRaw "-" }} {{/* ["blue" "7"] */}}
{{ $playedCard := sdict
  "Color" ( index $cardSplit 0 )
  "Number" ( index $cardSplit 1 )}}

{{ $previousCard := ( dbGet .Channel.ID "uno-last-card" ).Value }}
{{ $validCard := or
  (eq $playedCard.Color $previousCard.Color)
  (eq $playedCard.Number $previousCard.Number) }}

{{ if $validCard }}
  {{ sendResponse nil (print .User " played a " $playedCard.Color $playedCard.Number) }}
  {{ dbSet .Channel.ID "uno-last-card" $playedCard }}
{{ else }}
  {{ sendResponse nil "You can't play that card!" }}
{{ end }}
Example 2: A user is setting up a new UNO game with a modal, they’ve filled out a ’number of decks in play’ and a ‘minimum number of cards to play’ field, triggering the following command which will update those values in database.

{{ $numberOfDecks := index .Values 0 }}
{{ $minCardsForUNO := index .Values 1 }}

{{ dbSet .Channel.ID "uno-decks" ( toInt $numberOfDecks ) }}
{{ dbSet .Channel.ID "uno-min_for_uno" ( toInt $minCardsForUNO ) }}
Responding to an Interaction
Initial Response
While technically not required, responding to an interaction with one of Discord’s allotted initial responses is crucial if you don’t want your users to see an error after interacting. An interaction may be responded to only once.
You can only respond to an interaction within the custom command triggered by said interaction, with the exception that
a CC executed with execCC by the triggered CC will be able to send initial responses to the triggering interaction as
well.
Possible initial responses:
- Output text in your script response field. This text will be sent as an interaction response.
- You can even use the
ephemeralResponsefunction to turn it ephemeral.
- You can even use the
- Use the
sendResponsefunction to send a response as soon as the function runs.- You can also use this to send
embedsorcomplexMessages. - You’ll need to send a
complexMessageand pass it"ephemeral" trueas an argument to send ephemeral messages. sendResponsecomes inNoEscapeandRetIDvariants too.- When sending an initial response,
sendResponsedoes not need an interaction token,nilcan be used.
- You can also use this to send
- Use the
sendModalfunction to show the user a modal. You cannot respond to a user submitting a modal by sending them another modal. - Use the
updateMessagefunction to edit the message the command triggered from. This works the same way as editing a message, however because it automatically targets the triggering message, the only argument required is the new message.
Interaction Function documentation
Following Up
Followups allow you to continue responding to an interaction after the initial response has been made. You can followup for up to 15 minutes after the user interacts, and you can follow up as many times as you’d like. Followups require the interaction token of the interaction they should be following up on.
Possible followups:
- Output text in your script response field. This text will be sent as an interaction followup.
- You can even use the
ephemeralResponsefunction to turn it ephemeral.
- You can even use the
- Use the
sendResponsefunction to send a followup as soon as the function runs. Note that this function morphs into sending followups if an initial response has already been made.- You can also use this to send
embedsorcomplexMessages. sendResponsecomes inNoEscapeandRetIDvariants too.- It’s important to capture the message ID of any followups you’ll want to edit or retrieve later, especially if you followup ephemerally. If you followup ephemerally without saving the message ID, you’ll never be able to interface with that message again.
- You can also use this to send
- Use the
editResponsefunction to edit an initial response or a followup message.- When editing an initial response, the
messageIDargument should benil. - When editing a followup message, the
messageIDargument is required. - You can still edit any initial responses or followups using the standard
editMessagefunction as long as they aren’t ephemeral.
- When editing an initial response, the
- Use the
getResponsefunction to get an initial response or a followup message.- When getting an initial response, the
messageIDargument should benil. - When getting a followup message, the
messageIDargument is required. - You can still get any initial responses or followups using the standard
getMessagefunction as long as they aren’t ephemeral.
- When getting an initial response, the
Interaction Function documentation
Snippet
Here is a basic scenario where you need to use editResponse and getResponse to work with an ephemeral followup
message. You cannot use the standard editMessage or getMessage for this because it is an ephemeral message.
{{ $interactionToken := .Interaction.Token }}
{{ sendResponse nil "Here's the first message!" }}
{{ $followupID := sendResponseRetID $interactionToken (complexMessage "content" "Here's a sneaky one!" "ephemeral" true) }}
{{ sleep 2 }}
{{ editResponse $interactionToken $followupID (print "I've edited this message to say " noun) }}
{{ $editedResponse := getResponse $interactionToken $followupID }}
{{ editResponse $interactionToken nil $editedResponse.Content }}
Here’s a scenario where you would want to update a message.
{{ $button := cbutton "label" "I won!" "custom_id" "i_won" }}
{{ $content := printf "Press this button when you win! The last person who won was %s! They wanted to say they are a %s %s." .User.Mention adjective noun }}

{{ $message := complexMessageEdit "content" $content "buttons" $button }}
{{ updateMessage $message }}